
How to Use GPT Image 2 for Anime Key Visuals
A five-lesson workflow for turning anime world cards into key visuals: the bridge, the classroom, the hands, the light and the absence.
How to Use GPT Image 2 for Anime Key Visuals
This guide teaches the model through a world. Instead of a list of magic phrases, you get five lessons — a bridge, a classroom, a pair of hands, a light and an absence — each built from a character card, an event and a camera position. By the end you should be able to write an anime key visual prompt in about four minutes and repair it in one pass.
It assumes no prior experience with image models and no encyclopaedic knowledge of A Silent Voice. You need the world’s cards, GPT Image 2 and one decision per lesson: what is happening in the next ten seconds. Every example image below is a real published work from this world.
What you need before you start
- One world with cards A character card, a location card and one event. The cards give you facts; the model gives you the picture. Do not ask the model to invent the facts.
- GPT Image 2 The detail-first model. It accepts reference images, handles small props and builds spatial depth. It is slower and more expensive than Krea 2, so use it for the frame you intend to keep.
- A style sentence One reusable sentence describing line quality, colour and shadow. You will paste it into every prompt in the series.
- An exclusion clause No text, no letters, no signage, no watermark, no logo. Anime models invent school signage unless you forbid it.
Lesson 1 — Read the card before the prompt
A prompt is not a description of a picture. It is a set of instructions for staging a scene that already exists in the world. Before you write a word of prompt, read the character card and write down three things: what this person wants in the scene, what they are hiding, and what their hands are doing. The first two decide the blocking; the third decides whether the image looks alive.
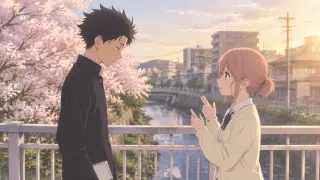
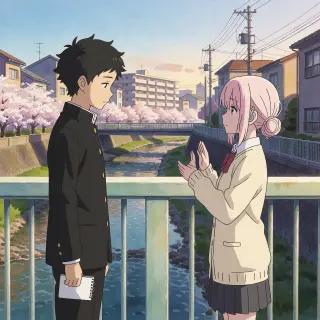
For Shōya, the card says: a quiet high-school senior, messy black hair, downcast eyes, a former bully who was then made the scapegoat. In the bridge scene he wants to apologise and to disappear at the same time. That contradiction gives you the staging: he stands too far away, holds the notebook closed, and looks at her shoes rather than her face. None of that is a style word. All of it is visible.
Character: one want, one fear
Write them as verbs. “Wants to be forgiven; fears being seen” is usable. “Sad and guilty” is not.
Location: one obstruction
Find the thing in the room that prevents easy movement: a railing, a desk, a doorway. Put it in the foreground.
Event: one unresolved action
Choose the action that is halfway through: a notebook being handed over, a hand half-raised, a door not yet closed. The image should catch the middle, not the end.
Lesson 2 — Build the frame in three planes
Anime key art reads best when the viewer can separate foreground, subject and background without thinking. Write them in that order. Foreground: the railing, the desk edge, the camera. Subject: the figures, placed at a specific distance from the foreground. Background: the river, the town, the blackboard. If you write the background first, the model tends to paste the figures on top of it like stickers.
Three planes, one line of action. The railing runs across the frame; the river runs away from it; the town stacks behind. That single geometry tells the viewer where everyone is standing before they read a single face.
The bridge prompt uses the railing as the foreground plane and the river as the receding middle ground. The town’s apartment blocks and power lines sit behind at a lower contrast, which keeps the figures dominant. The cherry tree on the left is not decoration; it stops the frame from feeling like a corridor and gives the light something to pass through.
Lesson 3 — Light is the argument
Do not describe the mood. Describe the light that produces it. “Warm low sun and long soft shadows” gives you late afternoon without naming melancholy. “Cold fluorescent light from above” gives you a classroom that feels like an institution. The model responds to direction and quality far more reliably than to adjectives.
For the bridge, one key and one fill is enough: the low sun from the left, a soft bounce off the pale railing. For the classroom, the window is the key and the green blackboard is the negative space. If you add a second window or a ceiling light, the room stops feeling empty and starts feeling lit for a photograph.
Lesson 4 — Direct the hands
Hands are where anime models fail most visibly, and where this story lives. Give every visible hand a job. Shōya’s hand holds the notebook or rests on the railing. Shōko’s hands are half-raised in a sign, not floating in a generic gesture. Yuzuru’s hand holds a camera. A hand with a job is easier to draw and more meaningful than a hand posed for elegance.
If a hand is central to the scene, say what it is doing and what it is near. “Her hands half-raised at chest height, palms toward him, a hearing aid visible behind her ear” is a block of instructions the model can follow. “She signs apologetically” is not. The model cannot infer grammar from an adverb.
Lesson 5 — Render absence
The hardest image in the set has no people in it. An open notebook and a pair of hearing aids on a desk; cherry petals; empty chairs; a clock. The prompt has to make the room feel recently occupied. The trick is to choose objects that imply a body: a pushed-back chair, an open page, a hearing aid placed rather than dropped. Then let the light do the rest.
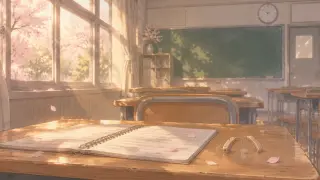
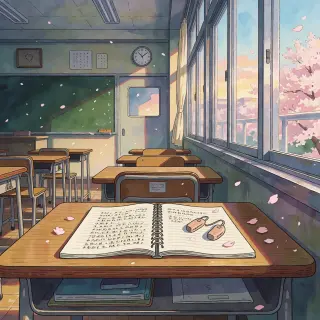
GPT Image 2 renders this as a still life with depth: the desk in the foreground, the rows receding, the blackboard holding the back wall. Krea 2 renders it as a colour event: the window becomes a flat poster shape and the objects become bold graphics. Both are valid; only one is a background plate. Decide which you need before you generate.
The prompt template
Format
“[Style] key visual, cinematic 16:9, [time of day].”
Place
“[Location] in [specific detail]. [Foreground obstruction] in the immediate foreground.”
Figures
“[Name], [age], [hair], [clothing], [posture], [where they are looking]. [Second figure] at [distance], [hands doing a job].”
Props
“[Object] in [which hand], [state: open/closed/half-raised], [second object] visible [where].”
Light and style
“[Key light] and [fill light], [shadow behaviour]. [Reusable style sentence].”
Exclusions
“No text, no letters, no signage, no watermark, no logo.”
The repair pass
Never rewrite the whole prompt after a bad render. Change one clause and regenerate. If the composition is wrong, fix the planes. If the faces are wrong, remove a character and simplify the silhouette facts. If the image is beautiful but empty, add an obstruction and a hand task. If the image is busy, remove a light source and one background detail. A repair pass should take one sentence, not a new paragraph.
- Composition flat? Add “immediate foreground” and a receding middle ground. Name the three planes explicitly.
- Faces off-model? Cut the cast to two and give each one silhouette fact only. Save the biography for the card.
- Hands fused? Give each hand an object and a position. Remove any hand that has nothing to do.
- Text appeared? Strengthen the exclusion clause and check the blackboard, posters and shop signs. Regenerate rather than paint over.
Style lock for anime consistency
Consistency is a sentence, not a model setting. Write one style lock and reuse it verbatim: “Fine precise anime linework with slightly tapered lines, transparent light local colour, low-contrast value groups, watercolour-like transitions, soft controlled shadows.” That sentence does more for a series than any seed. It tells the model what kind of mark to make, how colour sits on the page, and how much contrast to allow. Change one word and the series drifts.
If you need character consistency across scenes, add a reference image and keep the silhouette facts identical. Do not rely on the model remembering a face from a previous prompt. Treat every generation as a new shoot with the same actor, same costume and same lighting plot.
The two-work comparison method
Write one prompt
Use the same text, the same aspect request and the same exclusions for both models. Do not tune one prompt for one model; that destroys the comparison.
Generate the cheap pass first
Run Krea 2 first to test silhouette and palette. It is fast and about a quarter of the cost per image.
Rebuild the chosen frame in GPT Image 2
Keep the skeleton and the style lock. Spend the higher cost only on the composition you intend to publish.
Checklist before you publish
- Does the image explain the place? A viewer should be able to say where the foreground, the subject and the background are without being told.
- Is the story in the hands? Every visible hand should be holding, touching or signalling something. No decorative hands.
- Is there exactly one light idea? One key, one fill, one mood. If you cannot name them, the image is lit by accident.
- Is the text gone? Check the blackboard, the posters, the shopfronts and the corner of the frame. Regenerate if any lettering survives.
- Does it match the series? Compare it side by side with the previous image. If the line weight or the colour temperature has drifted, the style lock slipped.
- Is the share link real? Publish the work and open the share URL. The image on the page should be the exact file you approved, not a re-render.
Questions about this guide
- How long should a prompt be? Long enough to cover the seven clauses, short enough to debug. The bridge prompt is about 120 words. If yours is 300, you are probably writing the novel instead of the shot.
- Do I need the same seed for a series? No. Use the same style sentence and the same silhouette facts. Seeds are useful for small variations, not for continuity across scenes.
- Can I use Krea 2 for the final image? Yes, if you want a flatter poster look. It is faster and cheaper, but it does not accept reference images and is weaker at legible detail.
- What should I publish first? Publish the pair: the same prompt in both models. The comparison is the most useful thing you can show another creator, and it proves the prompt rather than the luck.
Put the guide to work
Five lessons, four published works and one world that needs another frame. Open the studio and generate the scene you can already see.