How to Use GPT Image 2 for Pixel Sandbox RPG Key Visuals — A Step-by-Step Guide with a Real Terraria World
Seven steps to banner-ready 16-bit sandbox RPG key visuals with GPT Image 2 — prompts, model comparisons, and troubleshooting, proven on real works from Terraria: The Corruption Below.
How to Use GPT Image 2 for Pixel Sandbox RPG Key Visuals
A practical, step-by-step guide to generating banner-ready 16-bit pixel sandbox RPG key visuals with GPT Image 2, using a real Neta Studio world — Terraria: The Corruption Below — as the worked example. By the end you will know how to choose a scene, cast a subject, control the light, run the two-model comparison, and publish covers that stay on-canon.
What You Need
- A world seed — fork the Terraria world or write a one-sentence sandbox RPG brief.
- A scene — a character, a location, a faction, and a moment worth a cover.
- A model pair — GPT Image 2 for detail, Krea 2 for map-like clarity.
- Thirty minutes — a handful of covers in one session, published as works.
Step 1 — Choose the Scene
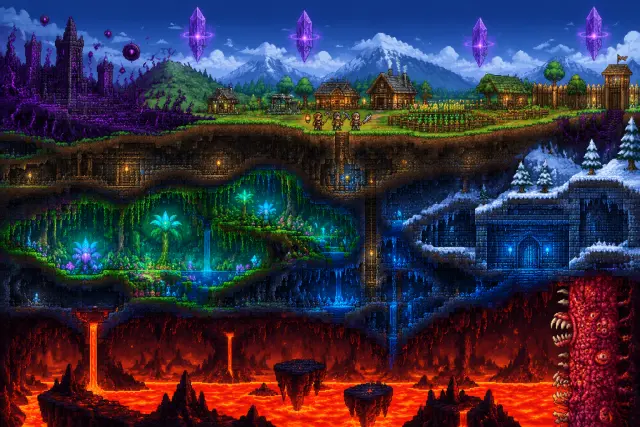
Start with a scene that has visual conflict. The world offers several: Haven Hollow at dusk with the palisade lit and the Ebon Rot dark beyond it, a vertical cutaway of the whole world, the Verdant Deep glowing under the mountain, the lava sea and the Wall of Flesh, or the blood moon over the roofs. Pick the one with the clearest power dynamic — a small lit town against a large dark mass is the fastest cover to read.
Step 2 — Cast the Subject
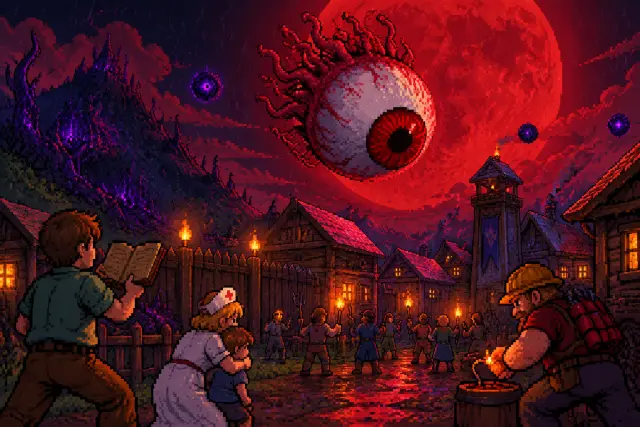
Name the character and their moment. The Guide with an open ledger at the gate gives the town its memory; the Nurse with an arm around a child gives the defense its stakes; the Demolitionist with a lit fuse gives the frame its action. In a sandbox cover, the subject is the scale reference: one small figure tells the viewer how big the wall, the eye, or the drop really is.
Prompt template: “[a subject] in [a place], [a moment], [an elemental accent], [a light]. Authentic hand-placed 16-bit-style pixel art, limited 24-color palette, three-step pixel shadows, selective dithering, tile-based, no text, no watermark.” Fill it once and reuse it — consistency is what makes a set of covers feel like one world.
Step 3 — Set the Mood with Light
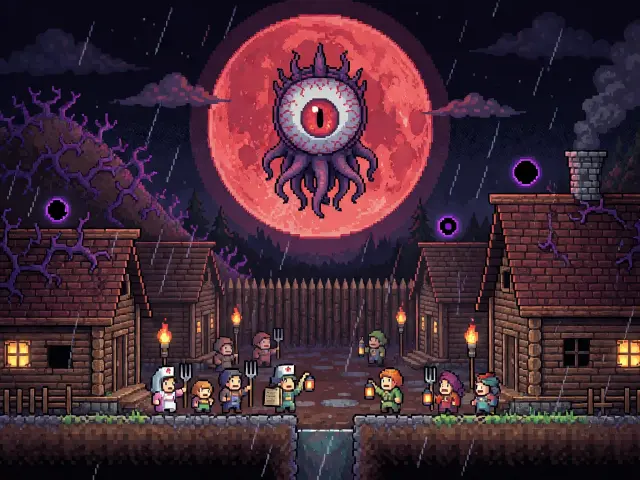
Light is the fastest way to make a sandbox cover read as key art. Warm lantern light sells safety and defiance; purple corruption glow sells wrongness; red blood-moon light sells emergency; lava orange sells depth and heat. State the light explicitly — “warm lantern light against purple corruption glow”, “red blood-moon light on wet roofs”, “lava orange under a black ceiling” — and the model will build the palette around it.
Step 4 — Run Both Models
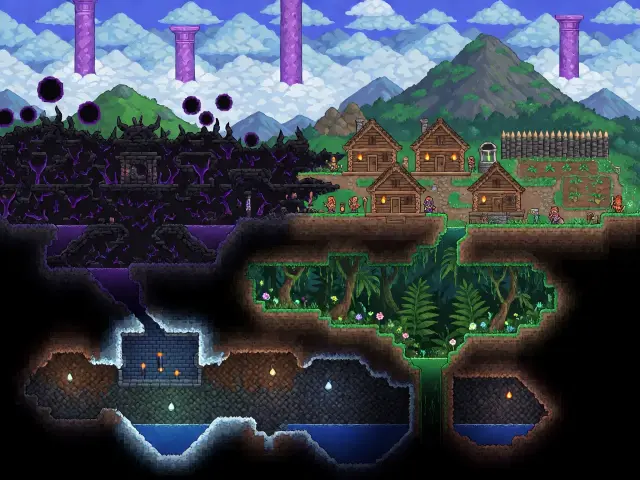
Run the exact same prompt through GPT Image 2 and Krea 2. On Neta Studio both renders publish as works of the world, side by side, so the comparison is the deliverable rather than an afterthought. GPT Image 2 answers with detail and structure; Krea 2 answers with clean, map-like clarity.
Step 5 — Compare and Choose
Compare the pair against your art direction. Detail-first suits covers, title screens, storefront banners, and complex event scenes; map-first clarity suits world maps, teasers, backgrounds, and UI. When the two are close, pick the one that survives a thumbnail crop — that is the frame a viewer actually sees first.
Step 6 — Publish and Iterate
Every render publishes as a shareable work of the world. Iterate by re-prompting the same scene with one variable changed — the light, the subject, or the moment — or by forking the world and rewriting its canon. The loop is the method: prompt, render both, compare, publish, repeat.
Write
Prompt the scene, subject, and light in one sentence.
Render
Run GPT Image 2 and Krea 2 on the same brief.
Compare
Publish both as works; compare against your direction.
Iterate
Re-prompt, fork, or build the next work from the same world.
Prompt Recipes That Work
- The vertical world — “a single vertical cutaway of a 16-bit sandbox world: a wooden town with torch-lit cabins and farms on the surface, black corruption and purple thorns to the west, a glowing jungle cavern below, a sealed blue-brick dungeon under snow, a lava sea at the bottom, four violet pillars in the sky, no text”.
- The blood moon — “a giant floating eye with a veined white sclera and a red iris descending out of an enormous crimson moon over a wooden town, rain, townsfolk with torches and pitchforks behind a palisade, a man with a ledger, a nurse shielding a child, 16-bit pixel art with three-step pixel shadows”.
- The town at dusk — “a small wooden town at the edge of a black corruption, warm lit windows, a stone well, tilled farms, a palisade, purple thorns creeping over the western hill, one hero with a lantern at the gate, limited 24-color palette”.
- The descent — “a hero in iron armor with a pickaxe and lantern at the mouth of a cave, warm light behind, black stone and purple veins ahead, a distant lava glow below, authentic 16-bit pixel art, no anti-aliasing”.
Troubleshooting
- Too smooth — add stronger style cues: “authentic hand-placed 16-bit-style pixel art, crisp nearest-neighbor square pixels, limited palette, not photography, no anti-aliasing”.
- Accidental text — add “no text, no watermark, no typography” and keep titles out of the prompt.
- Wrong palette — restate the world’s colors: “black stone, purple thorns, warm lantern amber, lava orange, deep indigo night”.
- Too busy — cut one element; a cover with two figures reads better than one with six.
- Model drift — re-anchor to the world seed and repeat the style block verbatim instead of paraphrasing it.
- Lost depth — ask explicitly for “a vertical cutaway” or “three distinct depth planes: foreground town, middle air, background moon”.
Step 7 — Render the World’s Turning Point
Once the steps are second nature, stress-test them on an event: the First Blood Moon, the night the Eye of Cthulhu descends and Haven Hollow learns the sky can look back. Event covers are harder — a moon, a monster, rain, a crowd, four named characters and a lit fuse — which makes them the best proof that your prompt and your world seed are doing the work.
What’s Next After the Poster
The key visuals in this guide are public works of the Terraria world — covers you can study, fork, and build on. Once the seven steps are second nature, use the same workflow on the world’s other scenes: the Verdant Deep, the sealed dungeon, the Wall of Flesh, the lunar pillars. Or fork the world and rewrite its canon to make the covers your own.
Frequently Asked Questions
- Can I follow this guide without the Terraria world? Yes — the steps are model-general. The world simply supplies a ready-made seed to practice on.
- Should I always run both models? For key visuals, yes — the comparison is fast and it makes the direction decision obvious.
- How do I keep a set consistent? Keep the world seed and the style cues fixed; vary only the scene, subject, and light.
- What size should I render? 1536×1024 for banners, 1024×1024 for cards; Krea 2 tops out at 1024 on the long edge.
- Where do the covers live? Every render publishes as a shareable work of the world on Neta Studio.
Start Your Key Visual
Follow the seven steps with GPT Image 2 — fork Terraria: The Corruption Below, run the pair, and publish your first cover. Your next 16-bit sandbox RPG key visual is one prompt away.
Start Your Key Visual
Follow the seven steps with GPT Image 2 — your 16-bit sandbox RPG key visual is one prompt away.