
How to Use GPT Image 2 for Xenoblade Character Key Visuals
A step-by-step guide to generating Xenoblade-style character key visuals with GPT Image 2: read the world, choose the frame, write the six clauses, render the engineer with the Monado and the valley where the titans' swords cross, then compare against Krea 2 without rewriting a word.
How to Use GPT Image 2 for Xenoblade Character Key Visuals
This guide walks through one complete job: turning a written brief for Shulk into a character key visual that belongs in a coherent set, then repeating the same sentence on a second model so you learn something from the comparison. It assumes no prior prompting experience beyond being able to describe a room and a person.
What You Are Actually Making
A character key visual is not an illustration of a character. It is a reference image that answers production questions: what does the vest look like from the front, where does the sword sit, what colour is the light, how big is the person next to the landscape. If the image cannot answer those questions, it is a mood board, not a key visual.
The target for this world is commercial game painterly: broad visible painted planes, hard brush-shaped structural edges, large connected local colour and value groups, detail only where it identifies the subject. That constraint is what keeps grass green, ether blue and Monado red legible instead of turning them into brown mud.
Step 0: Read the World Before You Write a Prompt
The most common failure in character generation is writing a prompt before deciding what the world looks like. Spend five minutes on the atoms: who the character is, what they want, where they stand in the hierarchy, and what the one warm light in their life is.
For Shulk the answers are unusually clear. He is an eighteen-year-old engineer, he has been raised among lab machinery, he stands on a grass ridge between a dead god and a live one, and the one warm light is a sun going down behind him. That is a picture before it is a prompt.
Step 1: Choose the Frame
Vertical 1024×1536 for a person. Horizontal 1536×1024 for architecture. Do not generate a character on a wide canvas and crop later; the model composes for the frame it is given, and a cropped poster loses the negative space that made it work.
The character frame wants the figure on one third, with the landscape receding on the other two. That asymmetry is what makes the image feel like a still from a journey rather than a portrait against a backdrop.
Step 2: Build the Six Clauses
Write the brief as six clauses in a fixed order. The order is not cosmetic: the model weights early tokens more heavily, and the costume must arrive before the lighting.
Subject and role
Name and job. “Shulk, an eighteen-year-old Colony 9 engineer and the bearer of the Monado.” Not “a sad anime hero”.
Costume and props
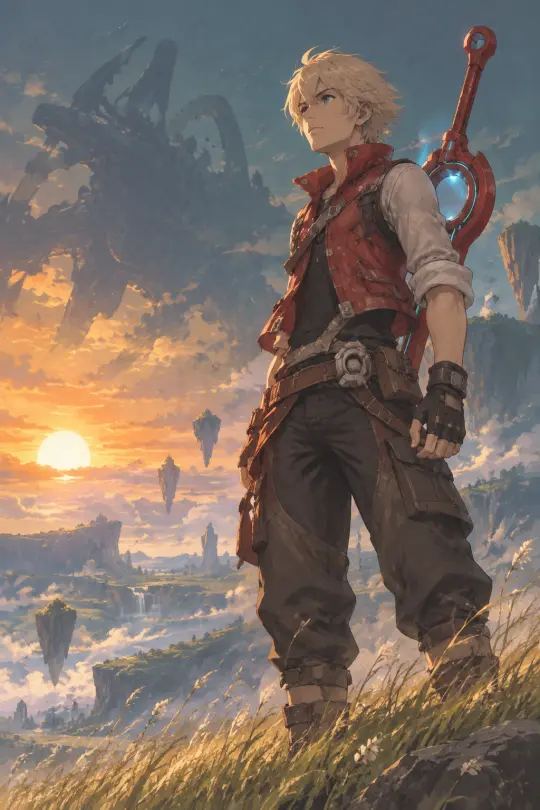
White-blond hair, blue eyes, a red sleeveless vest over rolled shirtsleeves, leather work straps, a tool belt, the red blade of the Monado across his back with a mechanical hilt glowing faintly cyan.
Place
A wind-bent grass ridge on the Gaur Plain at dusk, floating rock spires and drifting pollen, the colossal black silhouette of Mechonis on the horizon.
Light
Cold teal distance, one warm amber sun low behind him, dramatic rim light, volumetric pollen.
Style engine
Commercial game painterly, high-finish game art, broad visible painted planes, solid brush-shaped hard edges at structural turns and focal points, large connected local colour and value groups, deep-colour shadows, a few saturated accents.
Negative clause
No text, no letters, no signage, no watermark, no logo, no UI, no HUD.
Step 3: Choose the Model Deliberately
GPT Image 2 is the materials engine. It resolves the grain of cloth, the grain of leather, machined metal and the seams in a vest, it accepts reference images for continuity, and it is slower and pricier per frame. Krea 2 is the silhouette engine: fast, cheap, expressive, text-only, and prone to smoothing detail into shape.
Use GPT Image 2 when the frame has to survive as a reference. Use Krea 2 when you are still deciding what the character looks like. Using both on the same sentence is the cheapest way to learn which one your next ten images need.
Step 4: Set the Controls and Render
The published frame used gpt-image-2 at 1024×1536 with quality set to high, one render, no seed hunting. High quality matters more in this style than in photoreal work, because the whole image is edges and the small props are the evidence that a human made the vest.
Resist the urge to render four variants. A comparison between models is only useful if both got one attempt on the same sentence. Variant hunting turns a test into a lottery.
Step 5: Read the Result Like an Art Director
Check the frame in this order: silhouette at thumbnail size, then materials, then costume accuracy, then light, then text leaks. Most bad frames fail at step one and get fixed by simplifying the pose rather than by adding adjectives.
The Shulk frame passes because the vest, hair and sword read as one shape at 200 pixels, and because the warm sun sits exactly where the eye needs a rest from the teal. If either of those fails, rewrite clause two, not clause five.
Step 6: Repeat the Brief on a Second Model
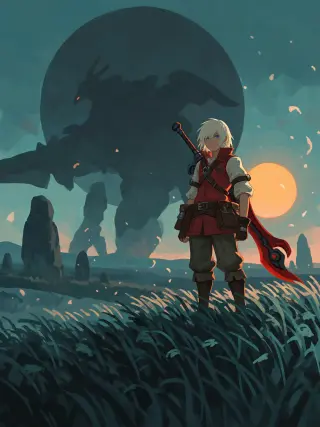
Send the identical text to Krea 2. Do not adjust it for the model, and do not add “illustration” or “poster” to help it along. The differences you see are the model's actual bias, which is what you wanted to learn.
In this pair, Krea 2 keeps the composition and loses the material. The vest becomes a flat red shape, the Monado becomes a single red stroke, and the grass becomes a texture under the feet. That is not a defect; it is a poster, and posters are supposed to prioritise shape.
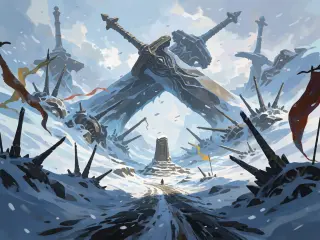
Step 7: Build the Second Frame for the Same World
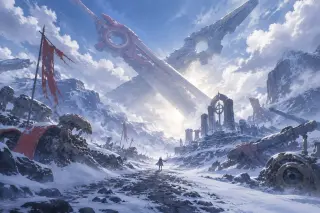
Once the character exists, render the place that argues with them. For this world that is Sword Valley: the frozen pass where the two titans' swords cross, a memorial road, wrecked Mechon and torn banners. Same six clauses, subject swapped for landscape, one tiny figure for scale.
The location frame is what makes the character frame mean something. Shulk on a ridge is a portrait; Shulk on a ridge with a god's sword in the sky is a world. Always publish both.
Common Mistakes and What They Cost
- Writing mood instead of scene. “A lonely hero” gives you a pose. “A lone engineer on a grass ridge at dusk with a red sword” gives you a story. Cost: one wasted render.
- Forgetting the negative clause. The model invents signage, UI and watermarks. Cost: a re-render and a lost comparison.
- Lighting before costume. Early tokens get spent on the sun and the vest turns generic. Cost: a frame that cannot be used as reference.
- Variant hunting. Four renders on one model make the comparison meaningless. Cost: the thing you were actually trying to learn.
- Cropping a wide frame. Composition collapses and negative space disappears. Cost: a poster that looks like a mistake.
Cost, Time and Repeatability
The character frame billed at roughly three and a half cents; the Krea 2 version at one cent. The four-frame set on this world came in under ten cents and a few minutes of wall-clock time. At that price, the expensive part of the job is deciding what the character is about, not rendering them.
Repeatability is the real test. If you can hand the same six clauses to a collaborator and get a frame that belongs in the same set, the brief is finished. If you have to explain the vibe, it is not a brief yet.
Who This Guide Is For
Quality Checklist Before You Publish
- Does the silhouette read at 200 pixels?
- Are there at least two distinct materials in the frame?
- Is there exactly one warm object?
- Is the costume identifiable without the caption?
- Is the landscape unmistakably part of a titan rather than generic terrain?
- Is there any legible text, signage or watermark? If yes, re-render.
- Would this frame sit next to the other three without looking like a different world?
GPT Image 2 vs Krea 2 for This Job
| Criterion | GPT Image 2 | Krea 2 |
|---|---|---|
| Material truth | Excellent | Suggestive |
| Silhouette | Good, can crowd | Excellent |
| Continuity via reference | Supported | Not supported |
| Speed | Slower | Fast |
| Cost per frame | ~$0.035 | $0.010 |
| Text rendering | Capable — but forbidden here | Avoid |
From One Frame to a World
Once the two-frame set exists, the world page, the tool page and the use-case page can all point at the same four works. Nothing is illustrated twice and nothing is claimed without a published image behind it.
That is the practical argument for documenting the brief: the images become evidence, and the evidence is reusable. A new character can join the set without the set having to be re-argued.
Make the First Frame
Take the six clauses, keep the negative sentence and render one character for a world that does not exist yet. Then render the landscape they are standing in.
Every image in this guide is a published work of the Xenoblade world on Neta Studio, rendered with GPT Image 2 and Krea 2 from the briefs reproduced above.